Monday, March 26, 2018

Cheddar Breakfast Biscuits


I'm a firm believer, that cheese goes in everything. These biscuits are definitely no exception! I even show you how to put an egg on them at the end, in case you need a little help there too!
This recipe is somewhat of a "cheaters" method for making biscuits from scratch. Though, you must know that some of your favorite breakfast restaurants use this method to make their thousands of fresh biscuits everyday.

Ingredients:

  • 1 Cup Bisquick - This Walmart brand is fine too! 
  • 1/3 Cup Buttermilk (or regular milk)
  • 1/2 Cup Shredded Cheddar Cheese ( I like mild personally) 
  • All Purpose flour (just a little to dust your counter) 
  • Optional- Garlic Salt for flavor on top. 
This recipe made 4 large biscuits. If you need more, feel free to double the recipe! 


Just a few simple ingredients!
I didn't have any buttermilk, so I put a teaspoon of vinegar in the 1/3 Cup of milk.
In just a minute or two you will see it curdle, which is what we are looking for.
(Turning milk into buttermilk is optional!)


I dumped out the bottom of the rest of the cheddar that we had. 
Looks like it came to about 1/2 a Cup for this recipe :) 


I got excited when making these biscuits, and didn't take a picture of the mixed dough. 
Combine the bisquick, milk and cheese. 
No special order or anything. 
Should look kinda thick. 
Dump onto a floured surface. 


I just used my hands to pat it down, instead of getting my rolling pin out. 
Then, I used a spatula to divide the dough into fourths. 
I don't like waste, so I made 4 square biscuits, rather than cutting a bunch of small ones out. 


I used a stick of butter to  grease the bottom of a pan. 
Afterwards I cut the top of the butter off to melt for the topping. 


I spooned melted butter on top , and sprinkled a little garlic salt before putting them in the oven. 
You can wait and put the butter on afterwards. I just did it now, so the garlic would stick. 


With the exception of that one guy, these look SO good!! 


Egg time. 
Put a generous amount of oil in a pan, and turn on medium heat.
(Usually a 5 on most stoves) 


When the pan is HOT (but not smoking)
Crack your eggs in the pan, and let them cook for just a second. 


I prefer to make my eggs Over-Well for my biscuits, because I don't like to make a mess, haha! 
So, at this point, I use my spatula to break the yolk, and let the egg continue to cook a few more minutes. 


After I flipped my eggs, I thought it would be a great idea to add more cheese. 
This is never a bad idea. 
Making sure not to let the American cheese touch my pan. 
No one wants to scrub a pan this early in the morning. 


That's it! You can add bacon or Sausage or whatever your heart desires!!
I was just feeling impatient....errr hungry, and decided this was good enough. 

Let me know if you decide to make it!
I post Food blogs every Monday and Craft blogs every Friday! 


I'm always available for trouble-shooting! 

Monday, March 19, 2018

Pizzadillas -Quick Lunch!


There's nothing wrong with a ham and cheese sandwich for lunch! It's a classic, and it gets the job done. But! What if, I told you that you could have the taste of a pizza, wrapped in the convenience of a quesadilla?? What if, I ALSO told you that they are cheap, easy and quick to make? Grab your ingredients, and become a believer!

Ingredients:

  • Tortillas
  • Mozzarella /Pizza cheese
  • Pepperoni
  • Pizza sauce- I used spaghetti sauce
That's it! Grab a saute pan or your griddle, and let's get started! 


My choice of ingredients. 
We usually have all 4 of these on hand at any given time. 
Prepare a hot griddle/pan with a little oil (or spray it with non-stick spray)


When your pan is hot (but not TOO hot!)
Put a tortilla down, and put sauce on one side.
(Or both sides, this is your lunch after all)
Reserve a little sauce if you'd like some to dip in :)


Spread a generous amount of cheese on top of the sauce! 


You guessed it, next layer is pepperoni!


A "little" more cheese on top of the pepperoni.
Close the quesadilla by grabbing the empty side and pulling it over the other half. 


Use a spatula to flip it over, so the last layer of cheese has a good chance to melt. 


I took mine over to a cutting board to slice up, but you're done!!


I hope you enjoyed this recipe!
This is one of my Go-To's when I want something different. 

I post Food blogs every Monday and Craft blogs every Friday! 
I'd love to see if you gave this a try! 


Monday, March 12, 2018

Spaghetti Squash with Homemade Bolognese Sauce!


Ready to try something new, but are skeptic to stray too far from what you know? Then this recipe is going to be perfect for you! It's the the New: Spaghetti Squash, and the Familiar: Meat Sauce! Squash is pretty cheap year round, so in the end this dinner is, delicious, cost effective AND healthy!

You may have been making Bolognese Sauces for years, and not even knowing it! It's just the "technical" name for a traditional tomato and meat sauce!

Pre-heat your oven to 350, and get your ingredients together!

Ingredients:

  • 1 whole Spaghetti Squash
  • Ground Beef
  • Tomato Sauce
  • Diced tomato (I used up a can I had on hand, but fresh is best!) 
  • Minced Garlic (Optional, but all Italian dishes NEED garlic! )
  • Bell pepper (I used 3 Sweet Mini Bell peppers, one regular size one will work fine.
  • Diced White Onion (1/4 of a whole one) 
  • (Don't forget the freezer isle has a nice selection of pre-cut veggies, there's no shame in using those! This is a judge free space!!) 
  • Seasonings- I used an Italian Mix (pictured in tutorial) 


First, you will need to cut off the bottom of the squash, so that it can stand on its own. 
Not a lot, just enough to make it sit flat. 


With it sitting flat, you should be able to easily and safely cut down the center of the squash. 
Go slow, if this is your first time cutting something this big! 


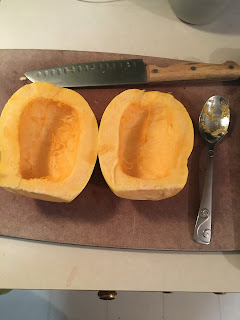
Nice! Smells a bit like pumpkin doesn't it? :)


Next take a spoon, and scoop out the seeds, and inside!
(Like you would a pumpkin!) 


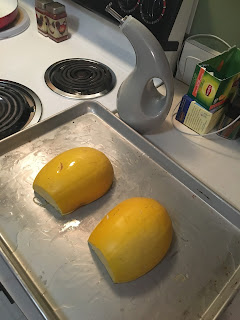
Next, oil up a sheet pan, and lay them skin side up. 
Place them in an oven preheated at 350. 
This part will take an hour, so come back 15-20 minutes before your timer goes off to start the meat sauce! 


All the things we need for the homemade Bolognese Sauce!


First, brown your meat while your Soux Chef cuts up your bell peppers and onion.
If you are not blessed with a kitchen assistant, you can cut up your veggies while your meat browns.
There's no real reason to babysit your ground beef. 


Out of my leftover 1/4 of an onion, and about 3 mini bell peppers, we got 1/2 cup total of veggies.
That's about 1/4 cup of each. 


With a little oil in the pan, over medium heat (around 5 on your stove dial) start sauteing your veggies. 
Add your minced garlic in at this time too! 
Oh. I'm using the same pan that I ground my beef in. 
The beef is sitting in a colander/pasta strainer in the sink. 


When your veggies are soft (The onions will start to look translucent) 
This is when we add our tomatoes. 
IF you are using canned, don't add your tomato sauce yet!
We are going to turn our stove up a little, and boil out the extra moisture from the canned tomatoes. 
You wont have to do this with a fresh tomato cut up. 

Now is also a good time to add your seasonings! 
(About 2 tablespoons of Italian Mix, is what I used)


You'll know when to add the tomato sauce when you can move the veggies around with out any extra juice going to the center. 
It took my pan about 5ish minutes to boil the extra juice out. 
Don't forget to turn your heat back down to medium. 


Add your tomato sauce (and meat)


And the Sauce is done!! 
At this point, the longer this sits on Low to cook, the better it will be. 
But, I'm impatient, and it's fine to eat now :)


My squash is a crispy on the edges, but the center is perfect. 
Just poke a fork in it to see how soft it is. 


With a fork, shred out the inside of the squash. 
It will come out super easily! 
(Don't be lazy like my Soux Chef... Take out the burnt bits, please) 


You can add your squash directly to the sauce, but I felt like it would drown in how much 1lb of ground beef made, so we just plated the squash up, and them ladled it on top! 


Is this something you will try?
I would love to see your version!!
Take a picture and let me see on my FB page!! 

I'm always taking requests for my food blogs! 
Need something for a specific diet?
Always wanted to try  ____  ,but not sure where to start?
Just give me a quick message! 


Monday, March 5, 2018

Roasted Chicken - Lazy Dinner


My husband and I have been very busy this weekend with chores and working in our nursery. That's no excuse for skimping on food though! That's when we turn to some of our favorite "Lazy Dinners"

Ingredients:

  • Chicken ( I used pre-seasoned for this) 
  • Potatoes
  • 1/2 cup of water
  • Any other veggies you like
  • Seasonings (I love Mrs. Dash for my 'lazy' seasoning needs) 
  • Dutch Oven, crockpot, or oven. 
TL;DR- Put water and veggies in a pot with a little water. Season. Place chicken on top. Put lid on pan. Let it cook for an hour or until chicken is done. 


First place 1/2 a cup of water at the bottom of your pot. 
Then throw your veggies in. No need to cut up potatoes if they are small.
This is a great time to clean out your fridge of fresh veggies that you might have had sitting around for "That one recipe" for a while. 


Place your raw chicken on top. I do this, so the juices and seasoning from the chicken will drip down onto the veggies and flavor them. If you didn't buy your chicken pre-seasoned (Or even if you did)
You can just season your veggies right before you put the chicken on top. 


My Kroger always has their packs of pre-seasoned chicken quarters for cheap. We usually buy a pack, and put them in the freezer for dinners like these. Though, sometimes we will roast/bake the whole pack off, and have roasted chicken on hand. And just one of those chicken quarters will feed my husband and myself. Though, in the future we will have to cook more than one, haha! 


I turned my stove on medium just for about 5 minutes, to get the pan hot.
I then put the stove back down to 'Low' and let it sit on the back of the stove for an hour. 


After an hour I temped it, and it was perfect!!
(You're looking for 165 to see if your chicken is done! And ALWAYS temp the Thickest part of the chicken! ) 


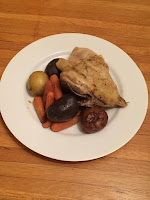
And that's it! We didn't make any other veggies or sides with it, this is just how we eat it.
It's so easy, and SO good!! 

Let me know if you'd like to see more "Lazy Dinners"
 I have quiet a few good ones up my sleeve! 
If you do decide to make this, or have any questions, hop on over to my
 Facebook Page
 I'd love to hear from you!